powershell reg add "HKCU\Software\Classes\CLSID\{86ca1aa0-34aa-4e8b-a509-50c905bae2a2}\InprocServer32" /f /ve

visual studio 2026 winform designer illegal characters in path 解决方法 修改文件 C:\Program Files\Microsoft Visual Studio\18\Community\Common7\IDE\devenv.exe.config
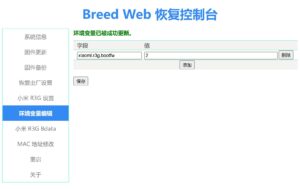
小米路由器hd-pro刷了Breed后,再刷openwrt后无法启动问题解决方法 在Breed Web恢复控制台中的 环境变量编辑中 添加字段 xiaomi.r3g.bootfw 值为 2 就可以了。
Rocky Linux 9 自动登录 只要在 /etc/gdm/custom.conf文件中的加下以下语句 [daemon] AutomaticLogin=用户名 AutomaticLoginEnable=True
CS-CART 种类页显示 add to cart按纽 /design/themes/responsive/templates/blocks/product_list_templates/products_multicolumns.tpl show_add_to_cart=$show_add_to_cart|default:false 改成 show_add_to_cart=$show_add_to_cart|default:true
使用putty ssh连接openwrt路由器,进行设置访客wifi,访客ip段设为192.168.100.1, SSID为 guest-wifi Configure network uci -q delete network.guest_devuci set network.guest_dev="device"uci set network.guest_dev.type="bridge"uci set network.guest_dev.name="br-guest"uci -q delete network.guestuci set network.guest="interface"uci set network.guest.proto="static"uci set network.guest.device="br-guest"uci set network.guest.ipaddr="192.168.100.1"uci set network.guest.netmask="255.255.255.0"uci commit network/etc/init.d/network restart Configure wireless WIFI_DEV="$(uci get wireless.@wifi-iface[0].device)"uci -q delete wireless.guestuci set wireless.guest="wifi-iface"uci set wireless.guest.device="${WIFI_DEV}"uci set wireless.guest.mode="ap"uci set wireless.guest.network="guest"uci set wireless.guest.ssid="guest-wifi"uci set wireless.guest.encryption="none"uci commit wirelesswifi reload Configure DHCP uci -q delete dhcp.guestuci set dhcp.guest="dhcp"uci set dhcp.guest.interface="guest"uci set dhcp.guest.start="100"uci set dhcp.guest.limit="150"uci set dhcp.guest.leasetime="1h"uci set dhcp.guest.netmask="255.255.255.0"uci commit dhcp/etc/init.d/dnsmasq restart Configure firewall uci -q delete firewall.guestuci set firewall.guest="zone"uci set firewall.guest.name="guest"uci set firewall.guest.network="guest"uci set firewall.guest.input="REJECT"uci set firewall.guest.output="ACCEPT"uci set firewall.guest.forward="REJECT"uci -q delete firewall.guest_wanuci set firewall.guest_wan="forwarding"uci set firewall.guest_wan.src="guest"uci set firewall.guest_wan.dest="wan"uci -q delete firewall.guest_dnsuci set firewall.guest_dns="rule"uci set firewall.guest_dns.name="Allow-DNS-Guest"uci set firewall.guest_dns.src="guest"uci set firewall.guest_dns.dest_port="53"uci set firewall.guest_dns.proto="tcp udp"uci set firewall.guest_dns.target="ACCEPT"uci -q delete firewall.guest_dhcpuci set firewall.guest_dhcp="rule"uci set firewall.guest_dhcp.name="Allow-DHCP-Guest"uci set firewall.guest_dhcp.src="guest"uci set firewall.guest_dhcp.src_port="68"uci set firewall.guest_dhcp.dest_port="67"uci set firewall.guest_dhcp.proto="udp"uci set firewall.guest_dhcp.family="ipv4"uci set firewall.guest_dhcp.target="ACCEPT"uci commit firewall/etc/init.d/firewall restart 引用:https://openwrt.org/docs/guide-user/network/wifi/guestwifi/guest-wlan
XIAOMI AX3600变砖急救 修复工具和固件下载网页 https://www1.miwifi.com/wap_download.html 下载小米路由器修复工具 https://bigota.miwifi.com/xiaoqiang/tools/MIWIFIRepairTool.x86.zip 按步骤把原厂固件刷进去 https://cdn.cnbj1.fds.api.mi-img.com/xiaoqiang/rom/r3600/miwifi_r3600_firmware_79ecc_1.1.25.bin ===================================================== 如升级后ssh被禁用可以用telnet登录,执行下面代码再次启用ssh 在telnet下运行始下命令 telnet 192.168.31.1 login:root password: ******** sed -i 's/channel=.*/channel="debug"/g' /etc/init.d/dropbear /etc/init.d/dropbear start ===================================================== 下载文件 https://firmware-selector.openwrt.org/?version=23.05.5&target=ipq807x%2Fgeneric&id=xiaomi_ax3600 刷的固件: https://downloads.openwrt.org/releases/23.05.5/targets/ipq807x/generic/openwrt-23.05.5-ipq807x-generic-xiaomi_ax3600-initramfs-factory.ubi 升级的固件 https://downloads.openwrt.org/releases/23.05.5/targets/ipq807x/generic/openwrt-23.05.5-ipq807x-generic-xiaomi_ax3600-squashfs-sysupgrade.bin 刷openwrt新方法网址 https://openwrt.org/toh/xiaomi/ax3600 1. ssh 到 192.168.31.1 把文件openwrt-23.05.5-ipq807x-generic-xiaomi_ax3600-initramfs-factory.ubi上传到 /tmp目录 2. 运行命令 ubiformat /dev/mtd13 -y -f /tmp/openwrt-23.05.5-ipq807x-generic-xiaomi_ax3600-initramfs-factory.ubi -s 2048 -O 2048 && nvram set flag_boot_rootfs=1 && nvram set flag_last_success=1 && nvram commit 3. 重启 reboot 4. http://192.168.1.1/cgi-bin/luci/admin/system/flash 下 Flash new firmware image 把文件 openwrt-23.05.5-ipq807x-generic-xiaomi_ax3600-squashfs-sysupgrade.bin 上传进行升级, 5. 重启 reboot ========================注意坑============================= 不要在刷好后的openwrt中升级一些新软件,会导致一系列问题,如不能dhcp等。 在ssh下运行如下命令 nvram set flag_last_success=0 nvram set flag_boot_rootfs=0 nvram set flag_boot_success=1 nvram set flag_try_sys1_failed=0 nvram set flag_try_sys2_failed=0 nvram set boot_wait=on nvram set uart_en=1 nvram set telnet_en=1 nvram set ssh_en=1 nvram commit 这里有时是mtd12,有时是mtd13,运行一条命令就可以 ubiformat /dev/mtd12 -y -f /tmp/openwrt-ipq807x-generic-xiaomi_ax3600-squashfs-nand-factory.ubi ubiformat /dev/mtd13 -y -f /tmp/openwrt-ipq807x-generic-xiaomi_ax3600-squashfs-nand-factory.ubi nvram set flag_last_success=1 nvram set flag_boot_rootfs=1 nvram commit reboot 返回原小米原厂固件 fw_setenv flag_last_success 0 fw_setenv flag_boot_rootfs 0 reboot =========安装插件================ 先安装luci-compat 插件网址 https://github.com/k-szuster/luci-access-control/releases https://github.com/cnxzp/openwrt-package/tree/master/lienol
先删除旧版本 yum remove -y libzip #下载编译安装 wget https://libzip.org/download/libzip-1.2.0.tar.gz tar -zxvf libzip-1.2.0.tar.gz cd libzip-1.2.0 ./configure make && make install 安装完成后,查看是否存在/usr/local/lib/pkgconfig目录,如果存在,执行如下命令来设置PKG_CONFIG_PATH: export PKG_CONFIG_PATH="/usr/local/lib/pkgconfig/" 编译 cd /www/server/php/81/src/ext/zip/ /www/server/php/81/bin/phpize ./configure --with-php-config=/www/server/php/81/bin/php-config make && make install 然后在 PHP 8.1 管理 → 配置文件末尾处,添加: echo "extension = zip.so" >> /www/server/php/81/etc/php.ini restart php